> ## Documentation Index
> Fetch the complete documentation index at: https://docs.paymentoptions.com/llms.txt
> Use this file to discover all available pages before exploring further.
# OpenCart
> Opencart 3.0.x.x – 3.1.x.xのインストールガイド
 * **説明**: OpenCartでゲートウェイ決済を有効にする。
## **インストール時に必要なマシンの要件**
* PHPバージョン5.6以上
* cURL
* OpenSSL
* OpenCart 3.0.x.xまたは3.1.x.x
* インストールはcPanel/FTP/管理パネルを通じてのみ行うことができます。このモジュールはワンページチェックアウトテンプレートに対応していない場合があります。
## **SME Dasgateway決済モジュールのインストール**
モジュールインストールは以下の方法で行えます
* FTPサーバー/cPanel または
* 管理パネル
## **FTPサーバー/cPanelを通じたモジュールインストール**
サーバーにOpenCart 3.0.x.x以上をインストールします。
Payment OptionsのGitHubから最新のソースコードzipファイルをダウンロードします
(ダウンロードリンクを使用: [https://github.com/paymentoptions/opencart-extension](https://github.com/paymentoptions/opencart-extension) )
「dasgatewayqr\_oc\_payment\_module\_3-0-x.ocmod.zip」を解凍します。
FTPクライアントを使って、‘admin’ と ‘catalogue’ フォルダをOpenCartのルートディレクトリにアップロードします。
## **管理パネルを通じたモジュールインストール**
管理パネルに資格情報でログインします。
Payment OptionsのGitHubから最新のバイナリzipファイルをダウンロードします
(ダウンロードリンクを使用: [https://github.com/paymentoptions/opencart-extension/releases](https://github.com/paymentoptions/opencart-extension/releases) )
「dasgatewayqr\_oc\_payment\_module\_3-0-x.ocmod.zip」を解凍します。
* **説明**: OpenCartでゲートウェイ決済を有効にする。
## **インストール時に必要なマシンの要件**
* PHPバージョン5.6以上
* cURL
* OpenSSL
* OpenCart 3.0.x.xまたは3.1.x.x
* インストールはcPanel/FTP/管理パネルを通じてのみ行うことができます。このモジュールはワンページチェックアウトテンプレートに対応していない場合があります。
## **SME Dasgateway決済モジュールのインストール**
モジュールインストールは以下の方法で行えます
* FTPサーバー/cPanel または
* 管理パネル
## **FTPサーバー/cPanelを通じたモジュールインストール**
サーバーにOpenCart 3.0.x.x以上をインストールします。
Payment OptionsのGitHubから最新のソースコードzipファイルをダウンロードします
(ダウンロードリンクを使用: [https://github.com/paymentoptions/opencart-extension](https://github.com/paymentoptions/opencart-extension) )
「dasgatewayqr\_oc\_payment\_module\_3-0-x.ocmod.zip」を解凍します。
FTPクライアントを使って、‘admin’ と ‘catalogue’ フォルダをOpenCartのルートディレクトリにアップロードします。
## **管理パネルを通じたモジュールインストール**
管理パネルに資格情報でログインします。
Payment OptionsのGitHubから最新のバイナリzipファイルをダウンロードします
(ダウンロードリンクを使用: [https://github.com/paymentoptions/opencart-extension/releases](https://github.com/paymentoptions/opencart-extension/releases) )
「dasgatewayqr\_oc\_payment\_module\_3-0-x.ocmod.zip」を解凍します。
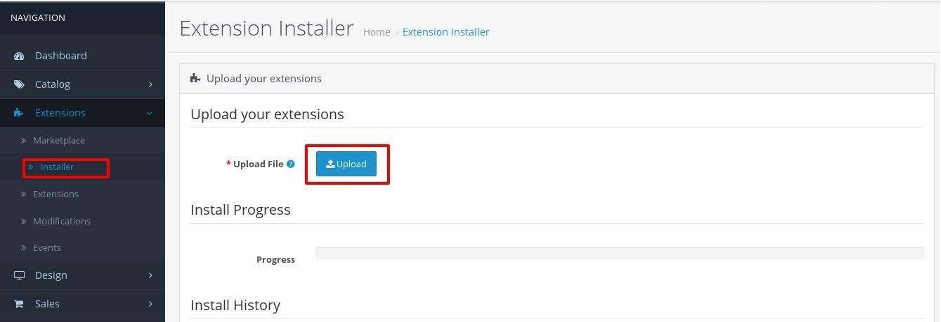 ユーザー名とパスワードでOpenCartストア管理にアクセスし、「拡張機能」メニューの下の「拡張機能」オプションをクリックし、画面上部のドロップダウンリストから「支払い」オプションを選択します。
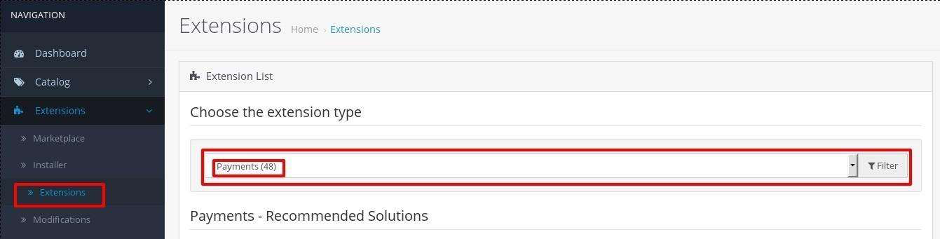 支払いリストの中に「SME Dasgateway」決済オプションが表示されます。
「+」オプションをクリックして「SME Dasgateway」支払いモジュールをインストールします。
支払いリストの中に「SME Dasgateway」決済オプションが表示されます。
「+」オプションをクリックして「SME Dasgateway」支払いモジュールをインストールします。
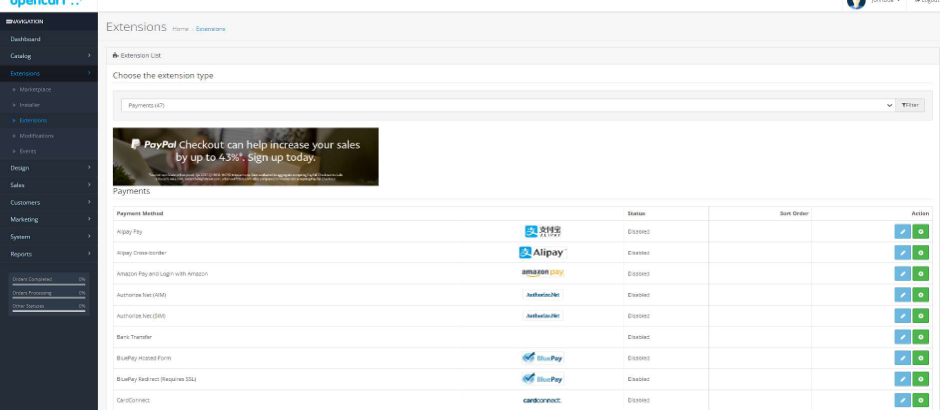 リストからSMEカテゴリーを選択します。
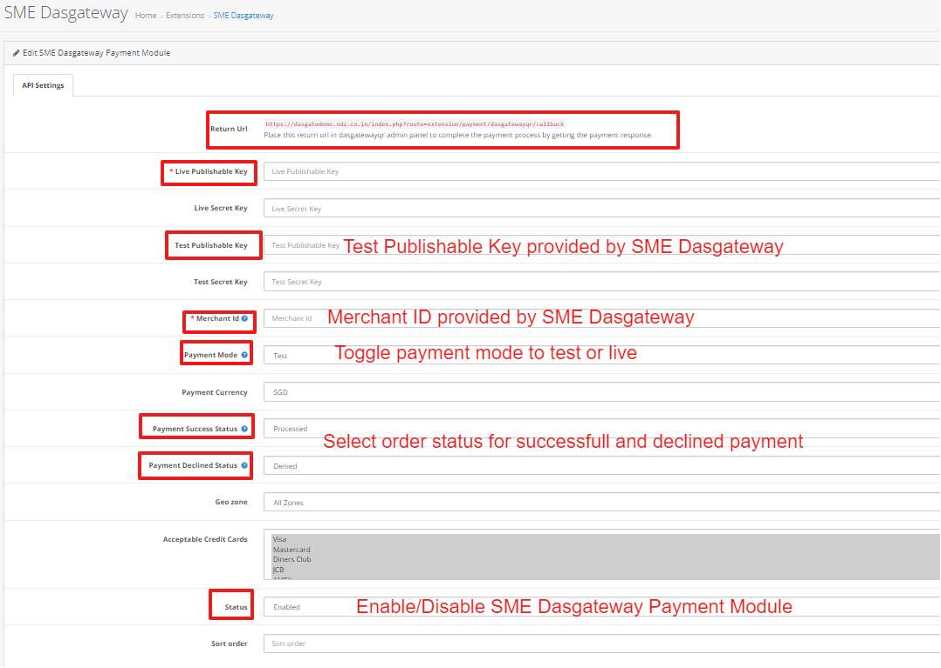
 インストール完了後、「SME Dasgateway」の設定ページを開くために編集ボタンをクリックします。
アクセストークン - Payment Optionsから受け取った「Secret API Key」を入力します。
加盟店ID - Payment Optionsから受け取った「加盟店ID」を入力します。
「ライブ」または「テスト」を切り替えて処理環境を選択します。
並べ替え順序を設定し、モジュールを有効にして支払いページで支払いオプションを有効にします。
インストール完了後、「SME Dasgateway」の設定ページを開くために編集ボタンをクリックします。
アクセストークン - Payment Optionsから受け取った「Secret API Key」を入力します。
加盟店ID - Payment Optionsから受け取った「加盟店ID」を入力します。
「ライブ」または「テスト」を切り替えて処理環境を選択します。
並べ替え順序を設定し、モジュールを有効にして支払いページで支払いオプションを有効にします。
 さらなるサポートが必要な場合は、[サポートチームにお問い合わせください](./support/contact)。私たちのチームは、問題解決をお手伝いします。